Connecting Windows Home Server to a Windows 7 Homegroup
One of the major innovations that Windows 7 brought to the networking table was the idea of a homegroup.
This is a collection of computers on a peer-to-peer network that use a
single password to share data between them. The idea is that once you
join a homegroup by entering the homegroup password, you never need to
worry about networking again because Windows 7 handles all the
connections for you automatically. This is in contrast to the more
traditional way of managing networking connections and sharing
resources, which is by setting up user accounts and passwords and then
assigning user permissions for each shared resource.
In other words, homegroups
are designed to make networking easier and less problematic for new and
inexperienced users, particularly home users. So it’s not surprising
that Windows Home Server 2011 comes with support for homegroups baked
in. If you already have a Windows 7 homegroup on your network, follow
these steps to join Windows Home Server to the homegroup:
1. | |
2. | Click Server Settings.
|
3. | Click the HomeGroup tab.
|
4. | Click Join Now. Windows Home Server prompts you to enter the homegroup password.
|
5. | Type the password and then click Join Now.
|
Viewing the Windows Home Server Network
With your Windows Home Server
networking tweaks done, you can now check to make sure that the rest of
the network can see the server:
- In Windows 7, click the Windows Explorer taskbar icon, and then click Network.
- In Vista, select Start, Network.
- In
XP, select Start, My Network Places, and then click View Workgroup
Computers. (If you have the Folders list displayed, open the My Network
Places, Entire Network, Microsoft Windows Network branch, and then click
your workgroup.)
Figure 1
shows Windows 7’s Network window, which displays icons for the
computers, devices, and shared media connections on the network (as does
the Network window in Vista). (XP just displays icons for the workgroup
computers.)
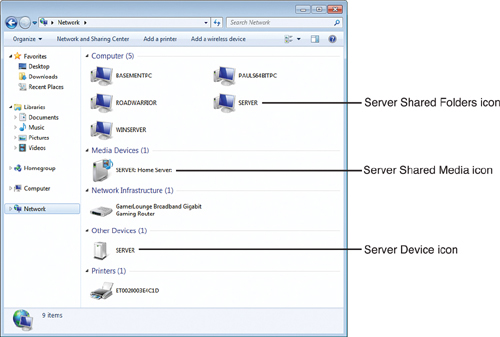
Notice that for the Windows Home Server machine, you might see as many as three icons:
- Server Device icon—Double-click
this icon to see data about the server as a network device. The data
includes the server’s IP address and MAC address.
- Server Shared Folders icon—Double-click this icon to see the server’s shared folders.
- Server Shared Media icon—Double-click
this icon to open Windows Media Player, which then lets you access the
server’s shared media. This icon appears only when you configure Windows
Home Server to share its Music, Photos, or Videos folders.
Troubleshooting Network Problems
Big-time corporate networking is a complex, arcane topic that taxes the patience of all but the most dedicated wireheads
(an affectionate pet name often applied to network hackers and gurus).
There are so many hardware components to deal with (from the network adapters to the cables to the routers to the hubs) and so many layers of software (from the device drivers to the protocols to the redirectors to the network providers) that big networks often seem like accidents looking for a place to happen.
Home
networks are much simpler beasts and, more often than not, they work
well right out of the box. That’s not to say that home networks are
bulletproof—not by a long shot. If your network has become a notwork (some wags also refer to a downed network as a nyetwork),
this section offers a few solutions that might help. I don’t make any
claim to completeness here, however. Most network ills are a combination
of several factors and are therefore relatively obscure and difficult
to reproduce. Instead, I go through a few general strategies for
tracking down problems and offer solutions for some of the most common
network afflictions.
Checking Connection Status
A good starting point
for diagnosing network problems is checking the status of the Windows
Home Server network connection. This shows you things such as your
connection status, connection speed, current IP address, network’s
default gateway addresses, DHCP server, DNS servers, and so on. Invalid
entries for these and other status items could provide a hint as to
where the network problem might lie.
To display the connection status, log on to Windows Home Server, select Start, type network, click View Network Connections to open the Network Connections window, and then double-click the connection.
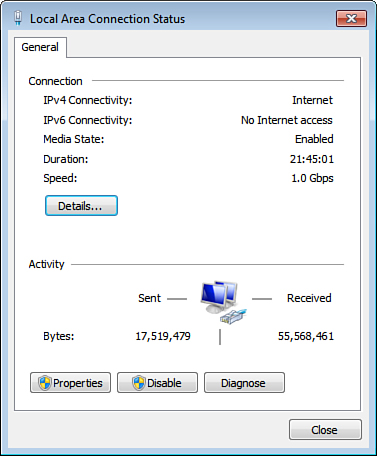
Figure 2 shows the Status dialog box that appears. In the General tab are two groups to check out, as follows:
- Connection—This
group shows the connection’s current status: Connected or Disconnected.
If the status value shows Connected, the Duration value shows how long
the connection has been active, and the Speed value shows the connection
speed in Mbps or Gbps.
- Activity—This
group shows the number of network packets that the connection has sent
and received. A low number for either value gives you a hint about the
direction of the problem. For example, a low Sent value might indicate
that Windows Home Server can’t communicate with the client computers.
Note
On most Windows Home
Server networks, the Received value is significantly higher than the
Sent value at first because you’re sending lots of data to the server.
After a while, however, the two values should be fairly balanced, with
one or the other being perhaps 10–40% higher than the other. On networks
that do a lot of media streaming, however, the Sent value may be
significantly higher than the Received value.
For other network connection
data, click the Details button to see information such as the addresses
of the DHCP server (this appears only if you’re using a dynamically
allocated IP address), DNS servers, and so on.
You can also click Diagnose to initiate the Windows Home Server network connection repair utility.
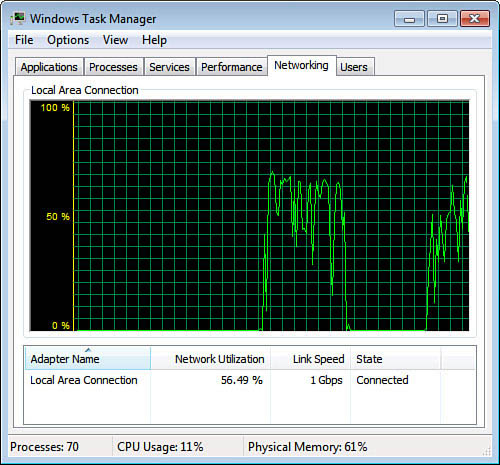
Checking Network Utilization
If your network feels sluggish,
it could be that the computer you’re working with is sharing data
slowly or that network traffic is exceptionally high. To see whether the
latter situation is the cause of the problem, you can check out the
current network utilization value, which is the percent of available bandwidth that your network adapter is currently using.
To check network utilization, follow these steps:
1. | Log on to Windows Home Server either locally or by using a Remote Desktop connection.
|
2. | Right-click an empty section of the taskbar, and then click Start Task Manager.
|
3. | Display the Networking tab, shown in Figure 3.
|
4. | If you have multiple adapters, click the one you want to check in the Adapter Name list.
|
5. | Use the graph or the Network Utilization column to monitor the current network utilization value. |